Notice: Undefined index: Twitter in /dom694484/wp-content/plugins/seo-automatic-links/seo-links.php on line 400
Notice: Undefined index: Twitter in /dom694484/wp-content/plugins/seo-automatic-links/seo-links.php on line 400
Notice: Undefined index: Sitemap in /dom694484/wp-content/plugins/seo-automatic-links/seo-links.php on line 400
Notice: Undefined index: Sitemap in /dom694484/wp-content/plugins/seo-automatic-links/seo-links.php on line 400
Notice: Undefined index: sitemap in /dom694484/wp-content/plugins/seo-automatic-links/seo-links.php on line 400
Notice: Undefined index: sitemap in /dom694484/wp-content/plugins/seo-automatic-links/seo-links.php on line 400
Notice: Undefined index: Guest Posting in /dom694484/wp-content/plugins/seo-automatic-links/seo-links.php on line 400
Notice: Undefined index: Guest Posting in /dom694484/wp-content/plugins/seo-automatic-links/seo-links.php on line 400
Notice: Undefined index: Budget Bathroom Makeovers in /dom694484/wp-content/plugins/seo-automatic-links/seo-links.php on line 400
Notice: Undefined index: Budget Bathroom Makeovers in /dom694484/wp-content/plugins/seo-automatic-links/seo-links.php on line 400
Notice: Undefined index: The Pros And Pros Of Metal Roofs in /dom694484/wp-content/plugins/seo-automatic-links/seo-links.php on line 400
Notice: Undefined index: The Pros And Pros Of Metal Roofs in /dom694484/wp-content/plugins/seo-automatic-links/seo-links.php on line 400
Notice: Undefined index: Top Five Door Knockers And Knobs in /dom694484/wp-content/plugins/seo-automatic-links/seo-links.php on line 400
Notice: Undefined index: Top Five Door Knockers And Knobs in /dom694484/wp-content/plugins/seo-automatic-links/seo-links.php on line 400
Notice: Undefined index: Do You Have An Exploding Toilet? in /dom694484/wp-content/plugins/seo-automatic-links/seo-links.php on line 400
Notice: Undefined index: Do You Have An Exploding Toilet? in /dom694484/wp-content/plugins/seo-automatic-links/seo-links.php on line 400
Notice: Undefined index: 5 Simple Steps to an Organized Garage in /dom694484/wp-content/plugins/seo-automatic-links/seo-links.php on line 400
Notice: Undefined index: 5 Simple Steps to an Organized Garage in /dom694484/wp-content/plugins/seo-automatic-links/seo-links.php on line 400
Notice: Undefined index: Laminate Flooring - Buying And Installing in /dom694484/wp-content/plugins/seo-automatic-links/seo-links.php on line 400
Notice: Undefined index: Laminate Flooring - Buying And Installing in /dom694484/wp-content/plugins/seo-automatic-links/seo-links.php on line 400
Notice: Undefined index: The Essential Tool Kit Guide For Christmas in /dom694484/wp-content/plugins/seo-automatic-links/seo-links.php on line 400
Notice: Undefined index: The Essential Tool Kit Guide For Christmas in /dom694484/wp-content/plugins/seo-automatic-links/seo-links.php on line 400
Notice: Undefined index: Above-Ground Versus In-Ground Swimming Pools in /dom694484/wp-content/plugins/seo-automatic-links/seo-links.php on line 400
Notice: Undefined index: Above-Ground Versus In-Ground Swimming Pools in /dom694484/wp-content/plugins/seo-automatic-links/seo-links.php on line 400
Notice: Undefined index: 5 Tips For Safe Holiday Lighting Decorations in /dom694484/wp-content/plugins/seo-automatic-links/seo-links.php on line 400
Notice: Undefined index: 5 Tips For Safe Holiday Lighting Decorations in /dom694484/wp-content/plugins/seo-automatic-links/seo-links.php on line 400
Notice: Undefined index: Home Improvement Tips To Help Sell Your Home in /dom694484/wp-content/plugins/seo-automatic-links/seo-links.php on line 400
Notice: Undefined index: Home Improvement Tips To Help Sell Your Home in /dom694484/wp-content/plugins/seo-automatic-links/seo-links.php on line 400
Notice: Undefined index: 5 Tips For Properly Installing A Ceiling Fan in /dom694484/wp-content/plugins/seo-automatic-links/seo-links.php on line 400
Notice: Undefined index: 5 Tips For Properly Installing A Ceiling Fan in /dom694484/wp-content/plugins/seo-automatic-links/seo-links.php on line 400
Notice: Undefined index: Collapsing Garage? Here's What You Need To Do in /dom694484/wp-content/plugins/seo-automatic-links/seo-links.php on line 400
Notice: Undefined index: Collapsing Garage? Here's What You Need To Do in /dom694484/wp-content/plugins/seo-automatic-links/seo-links.php on line 400
Notice: Undefined index: 5 Important Maintenance Tips For Ceiling Fans in /dom694484/wp-content/plugins/seo-automatic-links/seo-links.php on line 400
Notice: Undefined index: 5 Important Maintenance Tips For Ceiling Fans in /dom694484/wp-content/plugins/seo-automatic-links/seo-links.php on line 400
Notice: Undefined index: Infographic about the Makings of a Modern Home in /dom694484/wp-content/plugins/seo-automatic-links/seo-links.php on line 400
Notice: Undefined index: Infographic about the Makings of a Modern Home in /dom694484/wp-content/plugins/seo-automatic-links/seo-links.php on line 400
Notice: Undefined index: Bringing the Craftsman Style to Your House Plan in /dom694484/wp-content/plugins/seo-automatic-links/seo-links.php on line 400
Notice: Undefined index: Bringing the Craftsman Style to Your House Plan in /dom694484/wp-content/plugins/seo-automatic-links/seo-links.php on line 400
Notice: Undefined index: Building a Wooden Deck for Your Home in 7 Steps in /dom694484/wp-content/plugins/seo-automatic-links/seo-links.php on line 400
Notice: Undefined index: Building a Wooden Deck for Your Home in 7 Steps in /dom694484/wp-content/plugins/seo-automatic-links/seo-links.php on line 400
Notice: Undefined index: 5 Great Ways To Renovate A Basement On The Cheap in /dom694484/wp-content/plugins/seo-automatic-links/seo-links.php on line 400
Notice: Undefined index: 5 Great Ways To Renovate A Basement On The Cheap in /dom694484/wp-content/plugins/seo-automatic-links/seo-links.php on line 400
Notice: Undefined index: How To Accomplish All Your Home Improvement Goals in /dom694484/wp-content/plugins/seo-automatic-links/seo-links.php on line 400
Notice: Undefined index: How To Accomplish All Your Home Improvement Goals in /dom694484/wp-content/plugins/seo-automatic-links/seo-links.php on line 400
Notice: Undefined index: Home Improvement Tips Every Homeowner Should Know in /dom694484/wp-content/plugins/seo-automatic-links/seo-links.php on line 400
Notice: Undefined index: Home Improvement Tips Every Homeowner Should Know in /dom694484/wp-content/plugins/seo-automatic-links/seo-links.php on line 400
Notice: Undefined index: 5 Tips for Updating your Kitchen Lighting Fixtures in /dom694484/wp-content/plugins/seo-automatic-links/seo-links.php on line 400
Notice: Undefined index: 5 Tips for Updating your Kitchen Lighting Fixtures in /dom694484/wp-content/plugins/seo-automatic-links/seo-links.php on line 400
Notice: Undefined index: Frosted Glass Doors for Modern day Homes and Offices in /dom694484/wp-content/plugins/seo-automatic-links/seo-links.php on line 400
Notice: Undefined index: Frosted Glass Doors for Modern day Homes and Offices in /dom694484/wp-content/plugins/seo-automatic-links/seo-links.php on line 400
Notice: Undefined index: How Choosing The Right Windows Can Transform Your Rooms in /dom694484/wp-content/plugins/seo-automatic-links/seo-links.php on line 400
Notice: Undefined index: How Choosing The Right Windows Can Transform Your Rooms in /dom694484/wp-content/plugins/seo-automatic-links/seo-links.php on line 400
Notice: Undefined index: Top Changes and Projects That Can Help Your Home to Sell in /dom694484/wp-content/plugins/seo-automatic-links/seo-links.php on line 400
Notice: Undefined index: Top Changes and Projects That Can Help Your Home to Sell in /dom694484/wp-content/plugins/seo-automatic-links/seo-links.php on line 400
Notice: Undefined index: Incorporating Reclaimed Wood into your Home or Apartment in /dom694484/wp-content/plugins/seo-automatic-links/seo-links.php on line 400
Notice: Undefined index: Incorporating Reclaimed Wood into your Home or Apartment in /dom694484/wp-content/plugins/seo-automatic-links/seo-links.php on line 400
Notice: Undefined index: Don't Just Live There - How to Make the Most of Your Home in /dom694484/wp-content/plugins/seo-automatic-links/seo-links.php on line 400
Notice: Undefined index: Don't Just Live There - How to Make the Most of Your Home in /dom694484/wp-content/plugins/seo-automatic-links/seo-links.php on line 400
Notice: Undefined index: Wasted Space In Your Garage? Then Make The Most Out Of It! in /dom694484/wp-content/plugins/seo-automatic-links/seo-links.php on line 400
Notice: Undefined index: Wasted Space In Your Garage? Then Make The Most Out Of It! in /dom694484/wp-content/plugins/seo-automatic-links/seo-links.php on line 400
Notice: Undefined index: Christmas Light Decorations: 3 To Avoid This Holiday Season in /dom694484/wp-content/plugins/seo-automatic-links/seo-links.php on line 400
Notice: Undefined index: Christmas Light Decorations: 3 To Avoid This Holiday Season in /dom694484/wp-content/plugins/seo-automatic-links/seo-links.php on line 400
Notice: Undefined index: Electricians Tell Their Secrets: 5 Of The Worst DIY Attempts in /dom694484/wp-content/plugins/seo-automatic-links/seo-links.php on line 400
Notice: Undefined index: Electricians Tell Their Secrets: 5 Of The Worst DIY Attempts in /dom694484/wp-content/plugins/seo-automatic-links/seo-links.php on line 400
Notice: Undefined index: Popcorn Ceiling Removal: Tile Options For Your Popcorn Ceiling in /dom694484/wp-content/plugins/seo-automatic-links/seo-links.php on line 400
Notice: Undefined index: Popcorn Ceiling Removal: Tile Options For Your Popcorn Ceiling in /dom694484/wp-content/plugins/seo-automatic-links/seo-links.php on line 400
Notice: Undefined index: 5 Things To Do As Soon As You Notice Water Damage In Your Home in /dom694484/wp-content/plugins/seo-automatic-links/seo-links.php on line 400
Notice: Undefined index: 5 Things To Do As Soon As You Notice Water Damage In Your Home in /dom694484/wp-content/plugins/seo-automatic-links/seo-links.php on line 400
Notice: Undefined index: 3 Essential Jobs That Should Be Completed Before Winter Strikes in /dom694484/wp-content/plugins/seo-automatic-links/seo-links.php on line 400
Notice: Undefined index: 3 Essential Jobs That Should Be Completed Before Winter Strikes in /dom694484/wp-content/plugins/seo-automatic-links/seo-links.php on line 400
Notice: Undefined index: Moving with Pets: How to Keep Your Furry Companions Infographic in /dom694484/wp-content/plugins/seo-automatic-links/seo-links.php on line 400
Notice: Undefined index: Moving with Pets: How to Keep Your Furry Companions Infographic in /dom694484/wp-content/plugins/seo-automatic-links/seo-links.php on line 400
Notice: Undefined index: Cause for Alarm: Kids Aren't Easily Woken When Fire Alarms Go Off in /dom694484/wp-content/plugins/seo-automatic-links/seo-links.php on line 400
Notice: Undefined index: Cause for Alarm: Kids Aren't Easily Woken When Fire Alarms Go Off in /dom694484/wp-content/plugins/seo-automatic-links/seo-links.php on line 400
Notice: Undefined index: 6 Things To Think About When Hiring A Builder To Work On Your Home in /dom694484/wp-content/plugins/seo-automatic-links/seo-links.php on line 400
Notice: Undefined index: 6 Things To Think About When Hiring A Builder To Work On Your Home in /dom694484/wp-content/plugins/seo-automatic-links/seo-links.php on line 400
Notice: Undefined index: 5 Ways To Protect Your Home Before Scumbag Burglars Pay You A Visit in /dom694484/wp-content/plugins/seo-automatic-links/seo-links.php on line 400
Notice: Undefined index: 5 Ways To Protect Your Home Before Scumbag Burglars Pay You A Visit in /dom694484/wp-content/plugins/seo-automatic-links/seo-links.php on line 400
Notice: Undefined index: 5 Important Tips To Keep In Mind When You're Renovating The Basement in /dom694484/wp-content/plugins/seo-automatic-links/seo-links.php on line 400
Notice: Undefined index: 5 Important Tips To Keep In Mind When You're Renovating The Basement in /dom694484/wp-content/plugins/seo-automatic-links/seo-links.php on line 400
Notice: Undefined index: 5 Changes To Make Inside Your Bedroom So You Will Start Using It More in /dom694484/wp-content/plugins/seo-automatic-links/seo-links.php on line 400
Notice: Undefined index: 5 Changes To Make Inside Your Bedroom So You Will Start Using It More in /dom694484/wp-content/plugins/seo-automatic-links/seo-links.php on line 400
Notice: Undefined index: Finding A Throne Fit For Your Home: Choosing A Toilet That's Right For You in /dom694484/wp-content/plugins/seo-automatic-links/seo-links.php on line 400
Notice: Undefined index: Finding A Throne Fit For Your Home: Choosing A Toilet That's Right For You in /dom694484/wp-content/plugins/seo-automatic-links/seo-links.php on line 400
Notice: Undefined index: 5 Tips for Landscaping Small Spaces: Container Gardens for Patios & Porches in /dom694484/wp-content/plugins/seo-automatic-links/seo-links.php on line 400
Notice: Undefined index: 5 Tips for Landscaping Small Spaces: Container Gardens for Patios & Porches in /dom694484/wp-content/plugins/seo-automatic-links/seo-links.php on line 400
Notice: Undefined index: Top Five Reasons Why You Shouldn't 'Do It Yourself' When It Comes To House Painting in /dom694484/wp-content/plugins/seo-automatic-links/seo-links.php on line 400
Notice: Undefined index: Top Five Reasons Why You Shouldn't 'Do It Yourself' When It Comes To House Painting in /dom694484/wp-content/plugins/seo-automatic-links/seo-links.php on line 400
Notice: Undefined index: Exterior Home And Property Improvements That Offer More Privacy And Improve Curb Appeal in /dom694484/wp-content/plugins/seo-automatic-links/seo-links.php on line 400
Notice: Undefined index: Exterior Home And Property Improvements That Offer More Privacy And Improve Curb Appeal in /dom694484/wp-content/plugins/seo-automatic-links/seo-links.php on line 400
Notice: Undefined index: tax in /dom694484/wp-content/plugins/seo-automatic-links/seo-links.php on line 486
Notice: Trying to access array offset on value of type null in /dom694484/wp-content/plugins/seo-image/seo-friendly-images.class.php on line 869
Notice: Trying to access array offset on value of type null in /dom694484/wp-content/plugins/seo-image/seo-friendly-images.class.php on line 869
Notice: Trying to access array offset on value of type null in /dom694484/wp-content/plugins/seo-image/seo-friendly-images.class.php on line 869
Notice: Trying to access array offset on value of type null in /dom694484/wp-content/plugins/seo-image/seo-friendly-images.class.php on line 871
Notice: Trying to access array offset on value of type null in /dom694484/wp-content/plugins/seo-image/seo-friendly-images.class.php on line 871
Notice: Trying to access array offset on value of type null in /dom694484/wp-content/plugins/seo-image/seo-friendly-images.class.php on line 874
Notice: Trying to access array offset on value of type null in /dom694484/wp-content/plugins/seo-image/seo-friendly-images.class.php on line 874
Notice: Trying to access array offset on value of type null in /dom694484/wp-content/plugins/seo-image/seo-friendly-images.class.php on line 885
Notice: Trying to access array offset on value of type null in /dom694484/wp-content/plugins/seo-image/seo-friendly-images.class.php on line 886
Notice: Trying to access array offset on value of type null in /dom694484/wp-content/plugins/seo-image/seo-friendly-images.class.php on line 887
Notice: Trying to access array offset on value of type null in /dom694484/wp-content/plugins/seo-image/seo-friendly-images.class.php on line 888
Notice: Trying to access array offset on value of type null in /dom694484/wp-content/plugins/seo-image/seo-friendly-images.class.php on line 889
Notice: Trying to access array offset on value of type null in /dom694484/wp-content/plugins/seo-image/seo-friendly-images.class.php on line 901
Notice: Trying to access array offset on value of type null in /dom694484/wp-content/plugins/seo-image/seo-friendly-images.class.php on line 902
Notice: Trying to access array offset on value of type null in /dom694484/wp-content/plugins/seo-image/seo-friendly-images.class.php on line 903
Notice: Trying to access array offset on value of type null in /dom694484/wp-content/plugins/seo-image/seo-friendly-images.class.php on line 904
Notice: Trying to access array offset on value of type null in /dom694484/wp-content/plugins/seo-image/seo-friendly-images.class.php on line 905
Kitchen countertops are one of the most prominent things you see in the kitchen. For this reason, in order to create a stylish kitchen, you must make sure that you find the right countertops to match the entire room. However, do not compromise functionality with style.
Decorating your simple countertops will help add an inspirational vibe when cooking. The best way to keep things interesting inside the kitchen is to make sure to keep things alive. Here are some step by step tips you can do by yourself to make kitchen counters that are stylish, functional, and unique –the best part is that it will not cost too much:
1. learn to get organized
Think of the things you need to do first before starting such as the design and the required materials that you need to jumpstart your activity. List out things such as the trowel, sandpaper, tiles, pry bar, adhesive, gloves, and rags before proceeding to the plan. Find a style that you want online. There are plenty of styles available. Find one that complements the rest of the room.
2. proceed to the layout
Place the tiles on top of the counter. Arrange it first before sticking them. Find an image that best suits your liking. Make sure that the layout is done according to the picture before proceeding to the final steps.
3. remove the existing counter styles by cleaning the dry surface
Remove the old counter by prying it then place the new tiles on top. Just make sure that you smoothen the surface after you remove the previous tiles. Regular sandpaper will do the trick.
4. clean and prepare the surface of the countertop
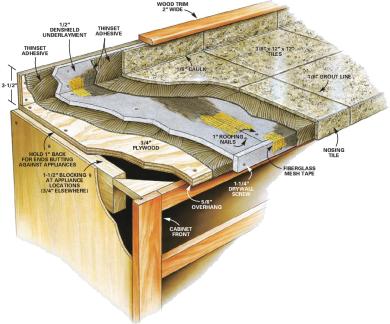 Make sure that you have dust away every bit on the top after prying the previous tiles are removed. Prepare the surface before putting you selected adhesive. Get a slice of the surface and try the adhesive fist on a smaller part.
5. learn how to stick the pieces accordingly
All you need is a thin surface of adhesive. Place the cement on the first section. This is actually the exciting part. Transfer the first tile from the layout you made earlier. Carefully stick to the cement and press gently on the adhesive. Continue doing this until you are finished on the first row. Repeat the process until the design is complete. Disperse the caulking materials on the surface of the tiles. Do not let it dry.
6. moisten the surface
Place a damp soft rag with warm water. Remove the excess caulk from the tile top. Make sure that the caulks on the sides of the tiles are not removed. Let these dry, just not ones on the surface.
7. unveil your work of art!
The steps are really simple and very basic. There is absolutely no need to hire an expert for this DIY Project. Be proud of your work and showcase it to your family or neighbors the next time they come over.
Chef Linda Rosario is a food blogger from Chef Needs, one of the trusted suppliers of bakery display cases. She also loves to paint and dreams of having her own art gallery. Aside from painting and drawing, Linda has a heart for cooking and food.